Using Ring for Raspberry Pi Pico Microcontroller
In this chapter we will learn about Using Ring for Raspberry Pi Pico Microcontroller.
This extension is added to the Ring language starting from Ring 1.21.
Using this extension We can write Ring programs that runs on the RP2040 Microcontroller
Extension folder: ring/extensions/microcontroller/ringpico
Contents:
Install
Programming
Building
Deployment
Blink sample
LEDs sample
LED and Switch sample
Declarative Programming sample
Using Wokwi Simulator
Install
Install Ring 1.21 (Required to compile the Ring program in the Building step)
Install Pico-SDK from: https://github.com/raspberrypi/pico-setup-windows
Update config.bat to point to the Pico-SDK folder on your computer
Programming
Samples exist in the (ring/extensions/microcontroller/ringpico/projects) folder
You can create a sub folder for your project in the (projects) folder
You can update the (ring/extensions/microcontroller/ringpico/main.ring) file to load your project
Building
To build your project, just run the build.bat file
Deployment
Connect Raspberry Pi Pico to your computer while pressing on the BOOTSEL button.
Keep pressing the BOOTSEL button until you see the File Explorer window.
Run the deploy.bat file which will copy the ringpico.uf2 file to the device
Blink sample
DELAY   = 100
LED_PIN = PICO_DEFAULT_LED_PIN

gpio_init(LED_PIN)
gpio_set_dir(LED_PIN, GPIO_OUT)

while True
        gpio_put(LED_PIN, True)
        sleep_ms(DELAY)
        gpio_put(LED_PIN, False)
        sleep_ms(DELAY)
end
LEDs sample
DELAY   = 100
LED_PIN = PICO_DEFAULT_LED_PIN
LED1    = 14
LED2    = 15

aPins = [LED_PIN, LED1, LED2]

for nPin in aPins
        gpio_init(nPin)
        gpio_set_dir(nPin, GPIO_OUT)
next

while True
        gpio_put(LED_PIN, True)                                 sleep_ms(DELAY)
        gpio_put(LED1   , True)         gpio_put(LED2, False)   sleep_ms(DELAY)
        gpio_put(LED1   , False)        gpio_put(LED2, True)    sleep_ms(DELAY)
        gpio_put(LED_PIN, False)                                sleep_ms(DELAY)
end
LED and Switch sample
File: main.ring
load "mylib.ring"

SWITCH_PIN = 14
LED_PIN    = 15

func main

        oSwitch = new LEDSwitch {
                setPin(SWITCH_PIN)
                LED { setPin(LED_PIN) }
        }

        while True
                 oSwitch.process()
        end
File: mylib.ring
class LED

        Pin

        func setPin nPin
                Pin = nPin
                gpio_init(Pin)
                gpio_set_dir(Pin,GPIO_OUT)

        func Enable
                gpio_put(Pin,True)

        func Disable
                gpio_put(Pin,False)

class LEDSwitch

        Pin
        Status = False
        LED = new LED

        func setPin nPin
                Pin = nPin
                gpio_init(Pin)
                gpio_pull_up(Pin)

        func getStatus
                return gpio_get(Pin)

        func Process
                if ! getStatus()
                        Status = ! Status
                        if Status
                                LED.enable()
                        else
                                LED.disable()
                        ok
                        sleep_ms(30)
                        while ! getStatus() end
                        sleep_ms(30)
                ok
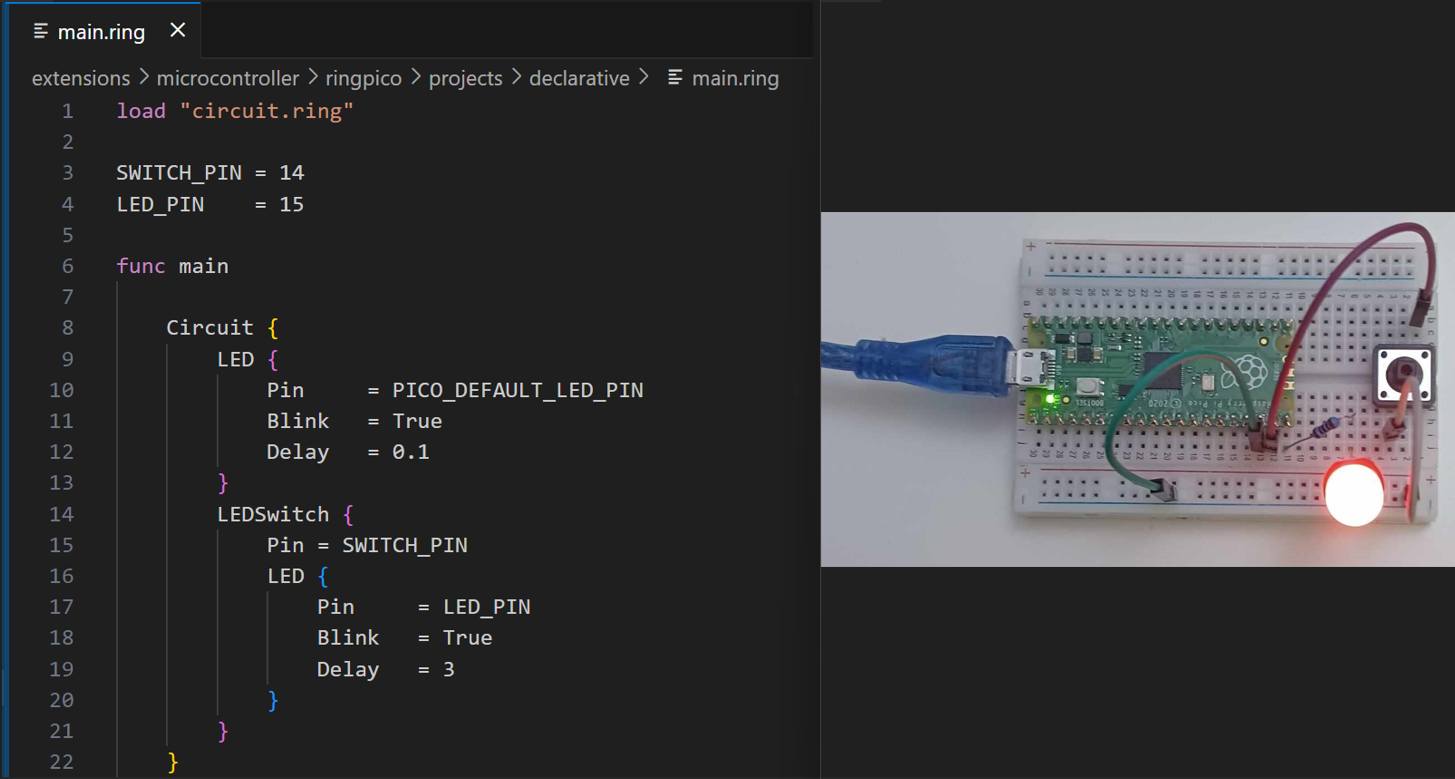
Declarative Programming sample
File: main.ring
load "circuit.ring"

SWITCH_PIN = 14
LED_PIN    = 15

func main

        Circuit {
                LED {
                        Pin     = PICO_DEFAULT_LED_PIN
                        Blink   = True
                        Delay   = 0.1
                }
                LEDSwitch {
                        Pin = SWITCH_PIN
                        LED {
                                Pin     = LED_PIN
                                Blink   = True
                                Delay   = 3
                        }
                }
        }
File: Circuit.ring
circuit = new Circuit

class Circuit

        LED
        LEDSwitch

        aObjects = []

        lCallBraceEnd = True

        func getLED
                aObjects + new LED
                return aObjects[len(aObjects)]

        func getLEDSwitch
                aObjects + new LEDSwitch
                return aObjects[len(aObjects)]

        func braceEnd
                if ! lCallBraceEnd return ok
                lCallBraceEnd = False
                while True
                        for oObj in aObjects
                                oObj.process()
                        next
                end

class CircuitComponent

        func process

class LED from CircuitComponent

        Pin

        Delay = 1
        Blink = False
        t1    = clock()

        lStatus         = False
        lCallBraceEnd   = True
        lEnableProcess  = True

        func setPin nPin
                Pin = nPin
                gpio_init(Pin)
                gpio_set_dir(Pin,GPIO_OUT)

        func Enable
                lStatus = True
                gpio_put(Pin,True)

        func Disable
                lStatus = False
                gpio_put(Pin,False)

        func braceEnd
                if ! lCallBraceEnd return ok
                enable()

        func process
                if ! lEnableProcess return ok
                if Blink and ( ((clock()-t1)/clockspersecond()) > Delay )
                        lStatus = ! lStatus
                        gpio_put(Pin,lStatus)
                        t1 = clock()
                ok

class LEDSwitch from CircuitComponent

        Pin
        Status  = False

        LED     = new LED { lCallBraceEnd = False lEnableProcess = False }

        func setPin nPin
                Pin = nPin
                gpio_init(Pin)
                gpio_pull_up(Pin)

        func getStatus
                return gpio_get(Pin)

        func Process
                LED.process()
                if ! getStatus()
                        Status = ! Status
                        if Status
                                LED.enable()
                        else
                                LED.disable()
                        ok
                        LED.t1 = clock()
                        LED.lEnableProcess = Status
                        sleep_ms(30)
                        while ! getStatus() end
                        sleep_ms(30)
                ok
Screen Shot:
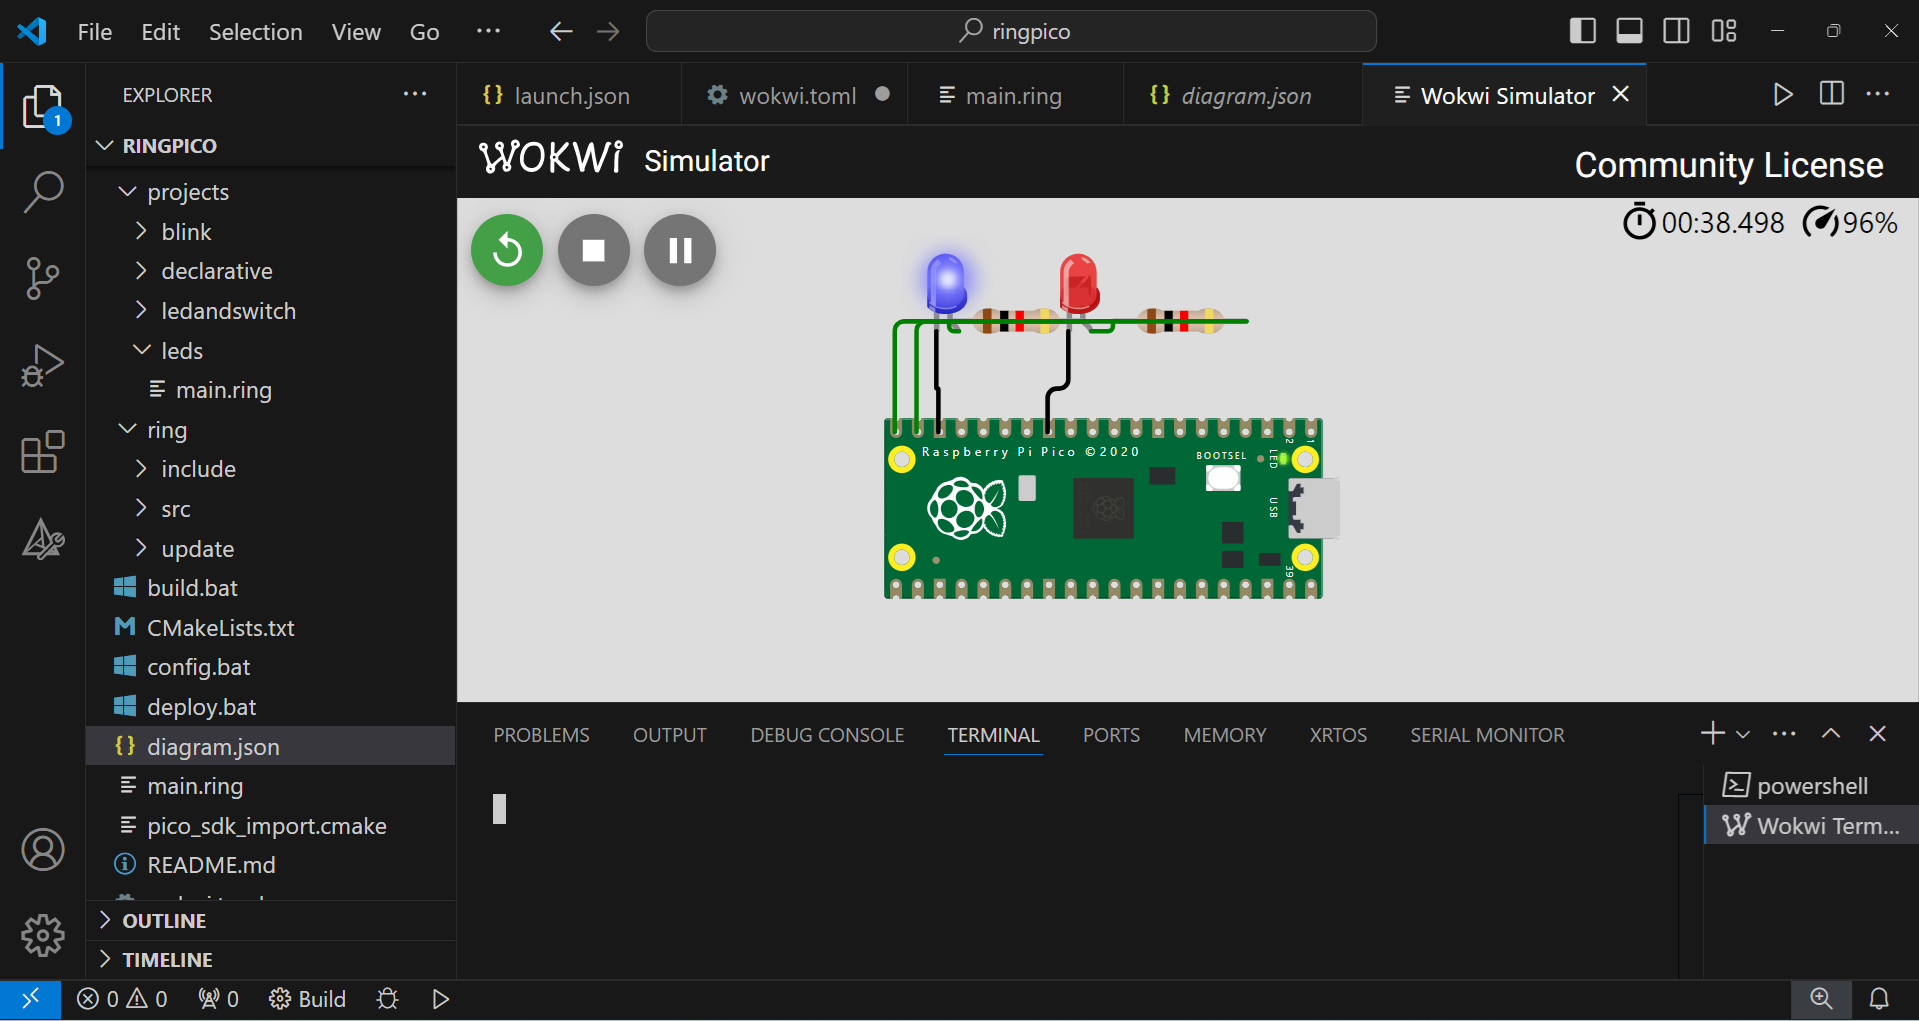
Using Wokwi Simulator
Using this simulator, We can test RingPico programs without the need to use real hardware.
Steps:
Update main.ring to use the LEDs project
load "projects/leds/main.ring"
Build the project using build.bat
Install Visual Studio Code
Install Wokwi Simulator extension
Open the folder ring/extensions/microcontroller/ringpico using VS Code
Run the project using the Simulator (Press F1 then select Wokwi: Start Simulator)
Screen Shot: