Building Games For Android
Chapter Author: Youssef Saeed
In this chapter, we will learn about building RingLibSDL games for mobile. This will allow us to create Android packages (.apk or .aab) for applications developed using the Ring Game Engine for 2D games.
RingLibSDL is a binding that connects the Ring programming language with the Simple DirectMedia Layer (SDL) library, providing a powerful framework for creating cross-platform games and multimedia applications.
Prerequisites
Before you begin, you need to have the necessary development tools installed on your system.
- Android Studio
The recommended way to get the Android SDK, NDK, and build tools is by installing the latest version of Android Studio.
- Android SDK
Android SDK Platform 36 or the latest available.
You can install and manage SDK platforms through the SDK Manager in Android Studio.
- Android NDK
Android NDK version r27 or later.
This can also be installed and managed through the Android Studio SDK Manager (
Tools>SDK Manager>SDK Toolstab).
- Java Development Kit (JDK)
JDK 17 or later. We recommend using a modern LTS version.
Recommended: Azul Zulu JDK 21 or later.
Alternative: Oracle OpenJDK 17 or later.
Note
If you prefer an automated setup, you can use the provided installation scripts (install_android_sdk.sh for Linux or install_android_sdk.ps1 for Windows) to install the JDK, Android SDK, NDK, and set up the environment automatically. See the Automated Setup using Scripts section below.
Automated Setup using Scripts
To simplify the installation process, you can use the provided scripts that automatically download and install the required components.
Installation Scripts
The install_android_sdk.sh (for Linux) and install_android_sdk.ps1 (for Windows) scripts will:
Download and install Azul Zulu JDK 21 LTS
Download and install Android SDK command-line tools
Download and install Android NDK r27
Download and install Android build tools, platform tools, and platforms
Accept Android SDK licenses
Set up environment variables for the current session and persistently
On Linux
Open a terminal.
Navigate to the project root directory.
Make the script executable and run it:
./install_android_sdk.sh
On Windows
Open PowerShell as Administrator.
Navigate to the project root directory.
Run the script:
.\install_android_sdk.ps1
Note
The Windows script requires administrator privileges to set persistent environment variables.
Environment Setup
For the command-line tools to work correctly, you should define the following environment variables based on your system’s configuration. If you used the automated installation scripts, these will be set up automatically.
- JAVA_HOME
This should point to the installation directory of your JDK. * Example (Windows):
C:\Program Files\Zulu\zulu-21orC:\Program Files\Java\jdk-17* Example (Linux/macOS):/usr/lib/jvm/openjdk17
- ANDROID_SDK_ROOT (or ANDROID_HOME)
This should point to the location of your Android SDK. * Example (Windows):
C:\Users\YourUser\AppData\Local\Android\Sdk* Example (Linux/macOS):/home/youruser/Android/Sdk
Download Third-Party Library Sources
The Android build process compiles third-party libraries like SDL2 from source. Before building the project, you must first download the source code for these required libraries.
Navigate to the ring/extensions/android/ringlibsdl/project directory and run the appropriate script for your operating system.
On Windows
Open PowerShell and run the download_deps.ps1 script:
.\download_deps.ps1
On Linux
Open your terminal and run the download_deps.sh script:
./download_deps.sh
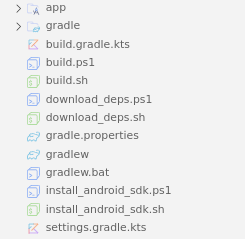
Project Folder
Open the project folder located at: ring/extensions/android/ringlibsdl/project
You can add your source code (*.ring), images, and sound files to the app/src/main/assets folder.
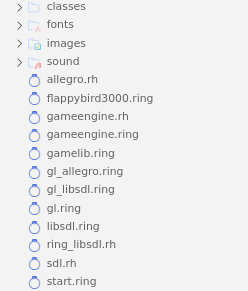
You will find the “Flappy Bird 3000” game ready for building. The execution starts from the start.ring file in the assets folder.
load "flappybird3000.ring"
Building the Project
The project can now be built using either the Gradle command-line wrapper, directly from Android Studio, or using the provided build scripts.
Method 1: Using Android Studio (Recommended)
Open Android Studio.
Select Open.
Navigate to and select the
ring/extensions/android/ringlibsdl/projectdirectory.Wait for Android Studio to sync the project with Gradle.
Once synced, you can build the project using the Build menu (e.g.,
Build>Generate App Bundles or APKs>Generate APKs).You can also run the application directly on an emulator or a connected device by clicking the Run button (green play icon).
Method 2: Using Gradle from the Command Line
If you prefer not to use the Android Studio GUI, you can build the project using the included Gradle wrapper.
Open a terminal or command prompt.
Navigate to the project directory:
cd ring/extensions/android/ringlibsdl/project
To build a debug APK, run the appropriate command for your system:
On Windows:
gradlew.bat assembleDebug
On Linux and macOS:
./gradlew assembleDebug
The generated APK will be located in the
app/build/outputs/apk/debug/directory.
Method 3: Using Build Scripts
For a fully automated build process, you can use the provided build scripts that handle environment setup and building.
The build.sh (for Linux) and build.ps1 (for Windows) scripts will:
Check for required prerequisites (JDK, SDK, NDK, Gradle wrapper)
Set up environment variables for the build session
Execute the Gradle build process
Display build output and results
On Linux
Open a terminal.
Navigate to the project root directory.
Make the script executable and run it:
./build.sh
On Windows
Open PowerShell.
Navigate to the project root directory.
Run the script:
.\build.ps1
Troubleshooting
Common Issues
- Gradle sync fails in Android Studio
Make sure you have the correct Android SDK and NDK versions installed as specified in the prerequisites section.
- Environment variables not recognized
If you didn’t use the automated setup scripts, ensure you’ve properly set the
JAVA_HOMEandANDROID_SDK_ROOTenvironment variables as described in the environment-setup section.- Build fails with missing dependencies
Run the appropriate dependency download script for your platform (
download_deps.shordownload_deps.ps1) as described in the download-third-party-library-sources section.- APK installs but crashes on launch
Check that all required assets are in the
app/src/main/assetsfolder and that thestart.ringfile correctly loads your main game file.
Next Steps
After successfully building your Android application:
Test the application on an actual Android device to ensure proper functionality.
Consider creating a signed release build for distribution: - In Android Studio:
Build>Generate Signed Bundle / APK- Follow the prompts to create or use an existing keystoreFor publishing to Google Play, generate an Android App Bundle (
.aab) instead of an APK.